


How to Install and Configure Android Studio in Windows 10
In this article, lets discuss something about the important of Android studio or App Developer. Also How can we setup and Android Studio for creating android application in our Windows 10 laptop.
To be successful, Android developers need a good grasp of the Java language (or Kotlin), Android APIs, and Android application architecture. It's also important to use an appropriate and effective development environment. For many years, Eclipse IDE with the ADT plugin was the preferred platform for Android development. Recently, it is changed to Android Studio IDE.
What's new in Android Studio 3.x
Find out what to look for in the latest version of Android Studio, including support for Kotlin, Java 8, and a wealth of new tools and plugins.
I'll briefly introduce the Android development platform, then show you how to download, install, and run the software. After that, we'll spend most of our time actually using Android Studio to develop an animated mobile app.
Get started with Android Studio
Android Studio is Google's officially supported IDE for developing Android apps. This IDE is based on IntelliJ IDEA, which offers a powerful code editor and developer tools. Android Studio 3.5 includes the following features:• A flexible Gradle-based build system
• A fast and feature-rich emulator
• A unified environment where you can develop for all Android devices
• Instant Run to push changes to your running app without building a new APK
• Code templates and GitHub integration to help you build common app features and import sample
code
• Extensive testing tools and frameworks
• Lint tools to help you catch performance, usability, version compatibility, and other problems
• C++ and NDK support
• Built-in support for Google Cloud Platform, making it easy to integrate Google Cloud Messaging
• Extensive testing tools and frameworks
• Lint tools to help you catch performance, usability, version compatibility, and other problems
• C++ and NDK support
• Built-in support for Google Cloud Platform, making it easy to integrate Google Cloud Messaging
and Google App Engine
• Plugin architecture for extending Android Studio via plugins
Google provides Android Studio for the Windows, Mac OS X, and Linux platforms. You can download Android Studio from the Android Studio homepage, where you'll also find the traditional SDKs with Android Studio's command-line tools. Before downloading Android Studio, make sure your platform meets the following requirements:
• 3 GB RAM minimum, 8 GB RAM recommended (plus 1 GB for the Android Emulator)
• 2 GB of available disk space minimum, 4 GB recommended (500 MB for IDE plus 1.5 GB for Android SDK and emulator system image)
• 1280 x 800 minimum screen resolution
• 3 GB RAM minimum, 8 GB RAM recommended (plus 1 GB for the Android Emulator)
• 2 GB of available disk space minimum, 4 GB recommended (500 MB for IDE plus 1.5
GB for Android SDK and emulator system image)
• 1280 x 800 minimum screen resolution
(64-bit distribution capable of running 32-bit applications)
• 64-bit distribution capable of running 32-bit applications
• GNU C Library (glibc) 2.19 or later
• 3 GB RAM minimum, 8 GB RAM recommended (plus 1 GB for the Android Emulator)
• 2 GB of available disk space minimum, 4 GB recommended (500 MB for IDE plus 1.5
GB for Android SDK and emulator system image)
• 1280 x 800 minimum screen resolution
Once you've ensured that your operating system is compatible with Android Studio 3.5 or higher, download the appropriate Android Studio distribution file. The Android Studio download page auto-detected that I'm running a 64-bit Windows operating system.
Launch the .exe file to start the installation process. The installer responded by presenting the Android Studio Setup dialog box shown in Figure 1.
Clicking Next took me to the following panel, which provides the option to decline installing an Android Virtual Device (AVD).
I chose to keep the default settings. After clicking Next, I was taken to the Configuration Settings panel, where I was asked to choose where to install Android Studio.
The installation location must have at least 500 MB free space.
I kept the default installation location and clicked Next, and was greeted with the Choose Start Menu Folder panel.
Select the folder in which to store Android Studio shortcuts
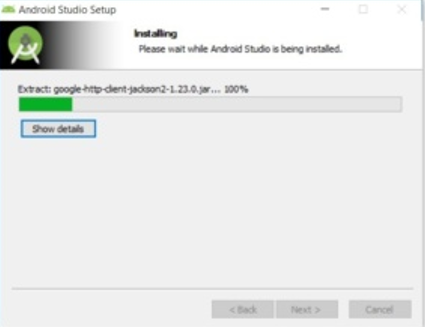
I kept the default setting and clicked Install. The following Installing panel appeared.
Figure 5: This panel shows the progress of the installation
Clicking Show details causes the names of files being installed and other activities to be displayed. When installation finished, the Installation Complete panel appeared.
Figure 6: The Next button is enabled when installation completes
After clicking Next, the installer presented the Completing Android Studio Setup panel.
Figure 7: Leave the Start Android Studio checkbox checked to run this software.
Installation has been completed, left the Start Android Studio box checked and clicked Finish.
Figure 8: A previous installation's settings can be imported
I chose do not to import settings (the default selection) and clicked OK, and was rewarded with the following splash screen:
Figure 9: Android Studio's splash screen
You can see an android studio splash screen while opening android studio first time.
Figure 10: Android Studio downloads any SDK components that are needed (and available) At this point, Android Studio presented the following Android Studio Setup Wizard dialog box:
Figure 11: The wizard provides setup and app-porting capabilities (click to enlarge
I clicked Next, and the wizard invited me to select an installation type. I kept the default standard setting.
Figure 12: Choose an installation type (click to enlarge)
I was then given the opportunity to choose a user interface theme.Lets chose the default IntelliJ setting and clicked Next.
Figure 13: Verify the settings and click finish.
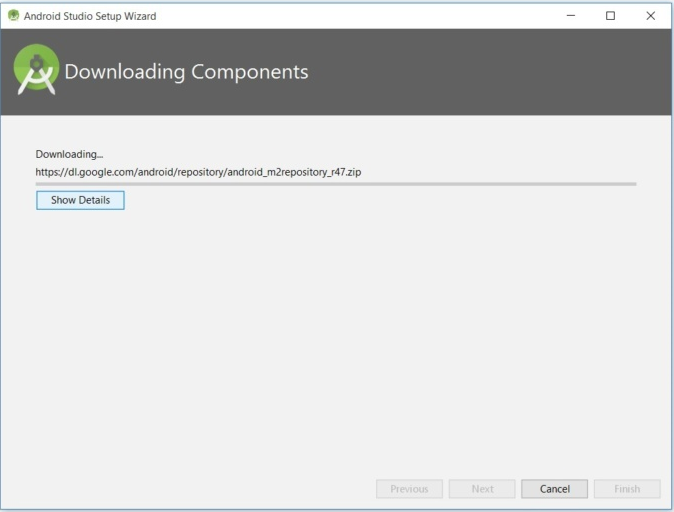
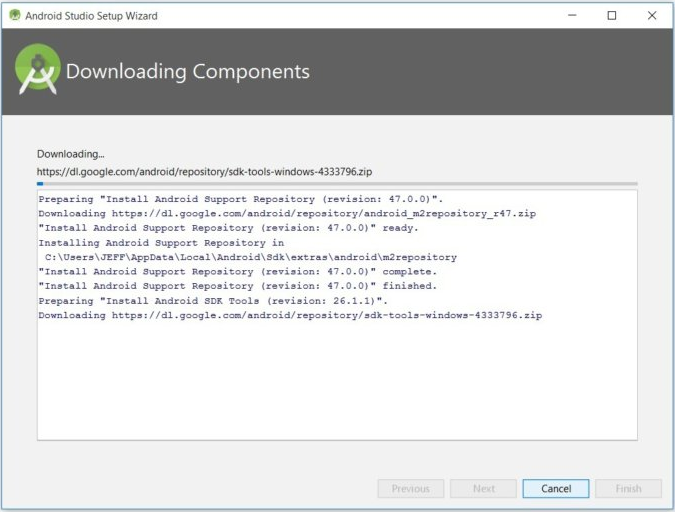
Figure 14: Android Studio identifies additional SDK components that will be downloaded.
Android studio will download the required components.
Figure 16: Once download click finish
Figure 17: Now Android Studio is ready to "Start a new Android Studio Project".
If you have any existing project backup you can import using the "Open an existing Android Studio Project" option as showing in figure 17.
Click "Start a new Android Studio Project" and wait to get the android studio synchronized completely. Once you got synchronized you are ready to start creating android studio projects. Done.!
• Plugin architecture for extending Android Studio via plugins
Download Android Studio
Google provides Android Studio for the Windows, Mac OS X, and Linux platforms. You can download Android Studio from the Android Studio homepage, where you'll also find the traditional SDKs with Android Studio's command-line tools. Before downloading Android Studio, make sure your platform meets the following requirements:
Windows Prerequisites:
• Microsoft Windows 7/8/10 (32-bit or 64-bit)• 3 GB RAM minimum, 8 GB RAM recommended (plus 1 GB for the Android Emulator)
• 2 GB of available disk space minimum, 4 GB recommended (500 MB for IDE plus 1.5 GB for Android SDK and emulator system image)
• 1280 x 800 minimum screen resolution
Mac OS Prerequisites:
• Mac OS X 10.10 (Yosemite) or higher, up to 10.13 (High Sierra)• 3 GB RAM minimum, 8 GB RAM recommended (plus 1 GB for the Android Emulator)
• 2 GB of available disk space minimum, 4 GB recommended (500 MB for IDE plus 1.5
GB for Android SDK and emulator system image)
• 1280 x 800 minimum screen resolution
Linux OS Prerequisites:
• GNOME or KDE desktop. Tested on Ubuntu 14.04 LTS, Trusty Tahr(64-bit distribution capable of running 32-bit applications)
• 64-bit distribution capable of running 32-bit applications
• GNU C Library (glibc) 2.19 or later
• 3 GB RAM minimum, 8 GB RAM recommended (plus 1 GB for the Android Emulator)
• 2 GB of available disk space minimum, 4 GB recommended (500 MB for IDE plus 1.5
GB for Android SDK and emulator system image)
• 1280 x 800 minimum screen resolution
Once you've ensured that your operating system is compatible with Android Studio 3.5 or higher, download the appropriate Android Studio distribution file. The Android Studio download page auto-detected that I'm running a 64-bit Windows operating system.
Installing Android Studio on 64-bit Windows 10
Once you downloaded the installation file for windows, your istallation file will be look like this, "android-studio-ide-181.5056338-windows.exe".Launch the .exe file to start the installation process. The installer responded by presenting the Android Studio Setup dialog box shown in Figure 1.
 |
| Figure 01 |
Clicking Next took me to the following panel, which provides the option to decline installing an Android Virtual Device (AVD).
 |
| Figure 02 |
I chose to keep the default settings. After clicking Next, I was taken to the Configuration Settings panel, where I was asked to choose where to install Android Studio.
 |
| Figure 03 |
The installation location must have at least 500 MB free space.
I kept the default installation location and clicked Next, and was greeted with the Choose Start Menu Folder panel.
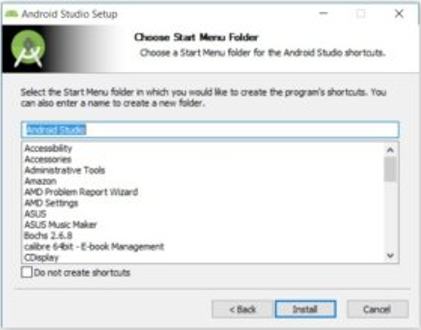 |
| Figure 04 |
Select the folder in which to store Android Studio shortcuts
I kept the default setting and clicked Install. The following Installing panel appeared.
Figure 5: This panel shows the progress of the installation
Clicking Show details causes the names of files being installed and other activities to be displayed. When installation finished, the Installation Complete panel appeared.
 |
| Figure 05 |
Figure 6: The Next button is enabled when installation completes
After clicking Next, the installer presented the Completing Android Studio Setup panel.
 |
| Figure 06 |
Figure 7: Leave the Start Android Studio checkbox checked to run this software.
Installation has been completed, left the Start Android Studio box checked and clicked Finish.
 |
| Figure 07 |
Configure Android Studio
The first time Android Studio runs, it presents a Complete Installation dialog box that offers the option of importing settings from a previous installation.Figure 8: A previous installation's settings can be imported
I chose do not to import settings (the default selection) and clicked OK, and was rewarded with the following splash screen:
 |
| Figure 08 |
Figure 9: Android Studio's splash screen
You can see an android studio splash screen while opening android studio first time.
 |
| Figure 09 |
 |
| Figure 10 |
I clicked Next, and the wizard invited me to select an installation type. I kept the default standard setting.
 |
| Figure 11 |
I was then given the opportunity to choose a user interface theme.Lets chose the default IntelliJ setting and clicked Next.
 |
| Figure 12 |
 |
| Figure 13 |
Figure 14: Android Studio identifies additional SDK components that will be downloaded.
Android studio will download the required components.
 |
| Figure 14 |
 |
| Figure 15 |
 |
| Figure 16 |
If you have any existing project backup you can import using the "Open an existing Android Studio Project" option as showing in figure 17.
 |
| Figure 17 |
Click "Start a new Android Studio Project" and wait to get the android studio synchronized completely. Once you got synchronized you are ready to start creating android studio projects. Done.!
0 Comments